Network Kings, India’s Leading IT Career Training Academy
- Email: support@nwkings.com
- SCO 41-43, B Block, 4th floor, Chandigarh Citi Center


Cisco Wireless Controller Configuration
As opposed to autonomous Wireless Access Points (WAPs), the lightweight, controller-based Wireless System brings much more benefits than the traditional standalone APs. In this session, we’ll briefly explain the benefits of a controller based wireless system and illustrate a typical wireless system design in a corporate environment. An in-depth, step-by-step tutorial on Cisco Wireless Controller Configuration (WLC) is followed. At the end of the session, I will also make recommendations on the equipment that you may want to consider.
Our configuration example is based on the highly popular Cisco Mobility Express Bundle, running on code 8.1.111.0. The bundle comes with a Cisco 2504 Wireless Controller and two Access Points. Depending on the AP models, the bundle is priced between $1500 and $3500 USD. The default license comes with the Controller that supports up to 25 APs and you may upgrade the license to 75 APs with code 7.4 and later. It is a great deal for any small to medium-sized business to set up their wireless infrastructure. It is robust, reliable and scalable.
Controller-based Wireless System benefits
Centralized Management, all configuration, code upgrade are managed at the controller level.
Easy to deploy APs, configurations are pushed to APs as they come online.
Hierarchical design makes it scalable: Each controller can manage hundreds of APs. Multiple controllers report to a centralized management system called Cisco Prim Infrastructure. Many people still use the Network Control System (NCS) and Wireless Control System (WCS).
- Radio Resource Management (RRM): Allows the controller to dynamically control power and channel assignment of APs. Cisco Unified WLAN Architecture continuously analyzes the existing RF environment, automatically adjusting the AP power levels and channel configurations to mitigate channel interference and signal coverage problems. (Pretty cool!)
- Mobility and roaming: All the APs within the same mobility group share the same configuration. As long as there is no coverage gap, wireless clients can roam among different APs without losing a ping. This feature enables employees to move between branch offices without changing their wireless configurations.
- Self-Healing Mechanism: When an AP radio fails, the controller detects the change and manages its nearby APs to increase their radio power to cover the hole.
- Client location tracking: If you deployed a Cisco Wireless Location Appliance in your system, you may import the building layout and pinpoint where a mobile user is located and which AP he/she is on.
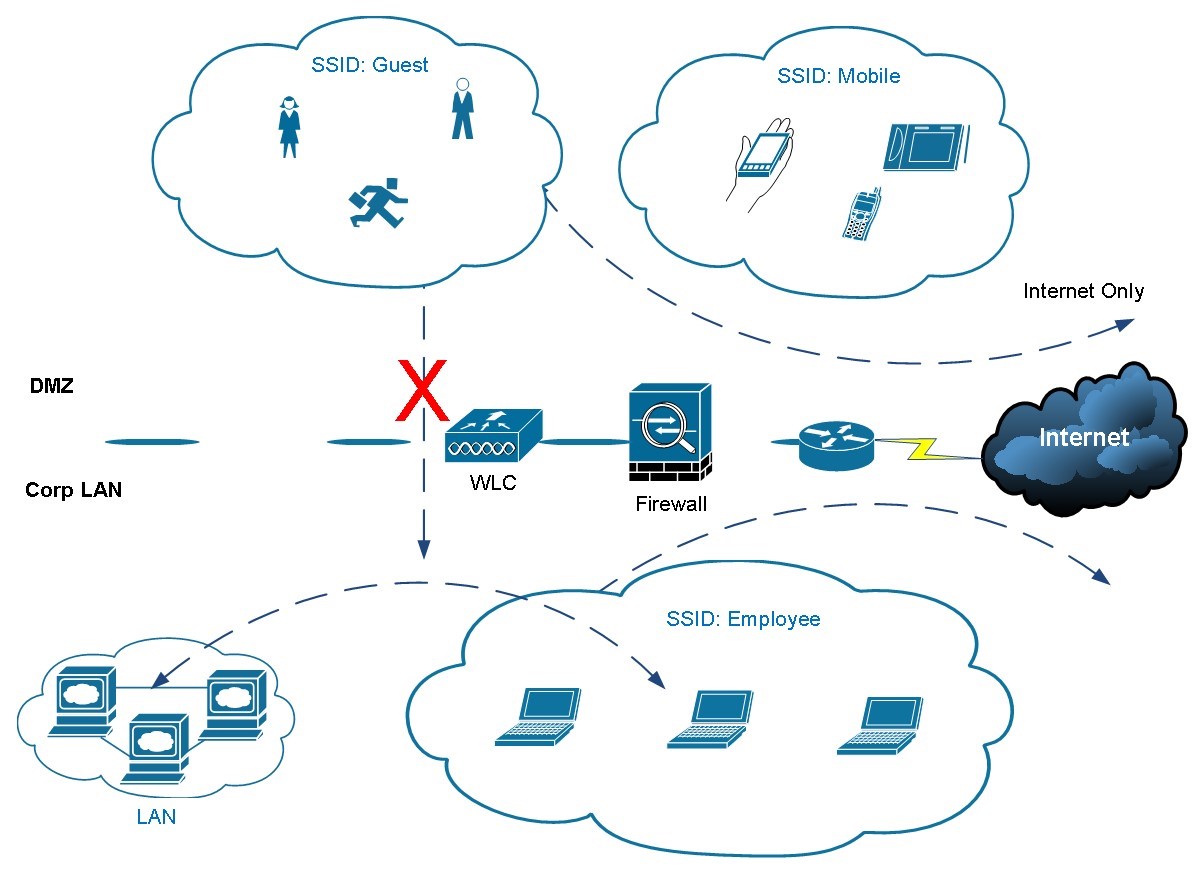
Wireless Network Design
- In a typical corporate environment, network consists of multiple VLANs and security layers. For simplicity, the sample network consists of 4 VLANs and 3 security zones.
- VLAN 99 = management network
- VLAN 100 = server network
- VLAN 101 = desktop user network
- VLAN 103 = wireless user network
- Firewall outside = Internet
- Firewall inside = LAN
- Firewall DMZ = guest Wi-Fi (no access to the LAN, Internet only.
IP assignment for the wireless infrastructure
- Wireless Controller Interfaces: management: 172.25.10.50 ap-manager: 172.25.10.50
- Virtual: 1.1.1.1
- AP01: 172.25.10.52
- AP02: 172.25.10.53
- SSID:
- Employee: VLAN103 – 10.2.123.2 /24
- Guest: 192.168.202.30 /24
You’ll need to prepare your servers and network to work with the wireless system:
- Microsoft Active Directory and DNS
- DHCP Server with new scope configured
- IP helper-address configured on the switch
- Microsoft Radius (IAS) Server
- Microsoft Enterprise root CA (optional)
- Separate DMZ for wireless infrastructure
- The logical traffic flow is shown.
Initial Setup for Wireless Controller
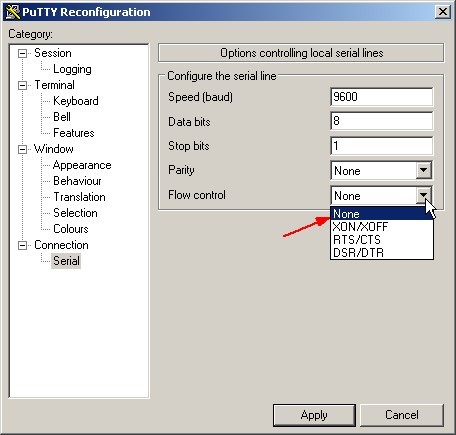
The product comes with a “Quick Start Guide”. If you tried to follow the direction on the Guide and setup the Controller you’ll quickly discover that it does not work. It asks you to connect a laptop to Port#2 and power up the Controller. Assign an IP from 192.168.1.x range on you laptop and access the Controller’s web console at http://192.168.1.1. In my case I found that website is not accessible after the Controller has booted up. I could not even ping the IP 192.168.1.1 from a laptop. The IP was pingable at one point during the boot process but eventually stopped.
After researching, I realized that the Controller needs to be first setup using CLI over a console cable. When the Controller is connected to a console cable and powered on, the boot sequence shows starting all the services. When tried to terminate the Auto-install script after pressing the Enter key, the console screen was frozen and would not accept any key input. Pinging and web browsing to 192.168.1.1 both timed out. I also tried from a different computer, tried factory reset on the Controller, same behavior. First I thought it was bad hardware.

After contacting Cisco support, the solution is “set flow-control to none” on your console client such as Putty and SecureCRT. I’ve been using the default console settings (with flow-control on) for many years and configured all kinds of Cisco product. I never had any issue. Ask why Cisco made their Wireless Controller special? Here is the setting you must use:
- 9600 baud
- 8 data bits
- No flow control
- 1 stop bit
- No parity
Now we can go through the initial setup wizard over console. Most questions are self-explanatory.
Welcome to the Cisco Wizard Configuration Tool
Use the ‘-‘ character to backup
Would you like to terminate auto install? [Yes]:
System Name [Cisco_43:5c:04] (31 characters max): CORPWLC
Enter Administrative User Name (24 characters max): admin
Enter Administrative Password (3 to 24 characters): ********* Re-enter Administrative Password : *********
Enable Link Aggregation (LAG) [yes][NO]: no
Management Interface IP Address: 172.25.10.50
Management Interface Netmask: 255.255.255.0
Management Interface Default Router: 172.25.10.1
Cleaning up Provisioning SSID
Management Interface VLAN Identifier (0 = untagged):
Management Interface Port Num [1 to 4]: 1
Management Interface DHCP Server IP Address:
Invalid response
Management Interface DHCP Server IP Address: 172.25.10.1
Virtual Gateway IP Address: 1.1.1.1
Multicast IP Address:
Invalid response
Multicast IP Address: 239.255.1.60
Mobility/RF Group Name: CORP
Network Name (SSID): Employee
Configure DHCP Bridging Mode [yes][NO]: yes
Warning! Enabling Bridging mode will disable Internal DHCP server and DHCP Proxy feature.
May require DHCP helper functionality on external switches.
Allow Static IP Addresses [YES][no]: yes
Configure a RADIUS Server now? [YES][No]: no
Warning! The default WLAN security policy requires a RADIUS server.
Please see documentation for more details.
Enter Country Code list (enter ‘help’ for a list of countries) [US]:
Enable 802.11b Network [YES][no]: no
Enable 802.11a Network [YES][no]: no
Enable Auto-RF [YES][no]: –
Enable 802.11a Network [YES][no]: –
Enable 802.11b Network [YES][no]: yes
Enable 802.11a Network [YES][no]: yes
Enable 802.11g Network [YES][no]: yes
Enable Auto-RF [YES][no]: yes
Configure a NTP server now? [YES][no]: no
Configure the system time now? [YES][no]: yes
Enter the date in MM/DD/YY format: 07/29/2015
Invalid response
Enter the date in MM/DD/YY format: 07/29/15
Enter the time in HH:MM:SS format: 16:49:00
Would you like to configure IPv6 parameters[YES][no]: no
Configuration correct? If yes, system will save it and reset. [yes][NO]: yes
Cleaning up Provisioning SSID
Configuration saved!
Resetting system with new configuration…
Configuration saved!
Resetting system with new configuration…
After the Controller has booted up, you can access its web interface at http://IP-address. In our example, it is http://172.25.10.50.

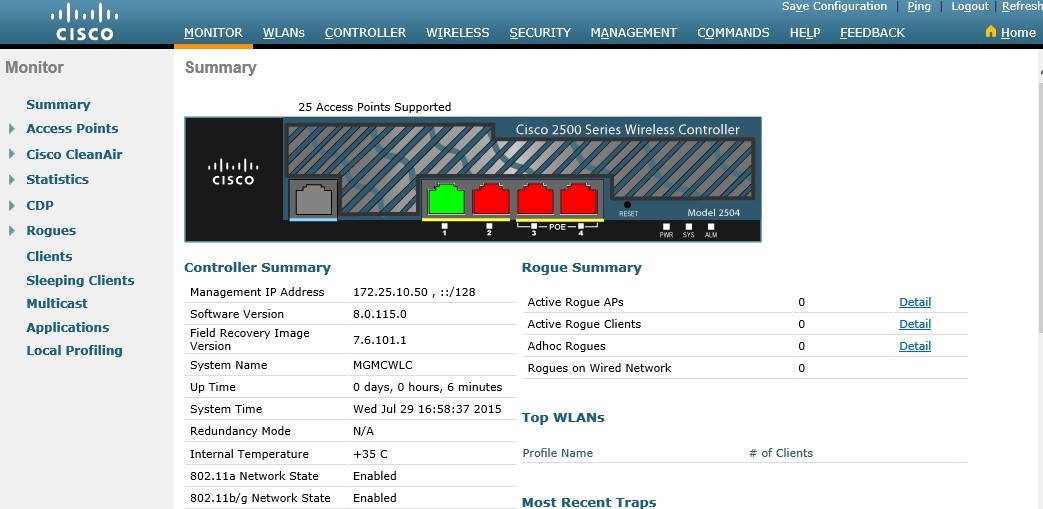
Go to Controller-Interfaces and confirm your management IP and virtual IP are set.
Initial Setup for Wireless Access Points (WAP)
This is the beauty of deploying a controller based system. The configuration on a WAP is minimum. All it needs is a management IP address so that it can report to the Controller. Once all the WAPs are registered with the Controller, you can forget about them. (Do remember behind which ceiling tile the APs are installed. After many years, you may not remember where they are.)
- There are two ways of setting up a Wireless Access Point (WAP):
- Use DHCP and the Controller will assign an IP to the WAP
- Use static IP for management
Unless you have hundreds of WAPs needed to be deployed on a large campus, I recommend staging the WAPs and assigning a static IP on each of them. Label with hostname and IP address where you can see without crawling into the ceiling. It’ll make your life a lot easier in the future. There is another reason why I recommend using static IPs for WAP management. Most network administrators do not like enabling DHCP service on the network infrastructure subnet. It makes sense that you want all the network devices to have a statically assigned IP address for easy management, monitoring and documentation purposes.
To get a WAP setup, there are two things you need to do – assign a static IP on the WAP, and tell it where to find the Controller to associate with (if it is not on the same broadcast domain).
Connect the WAP with Console cable, and power. If you purchased a Cisco Mobility Express Bundle, and most Cisco WAPs do not come with a power adapter. They assume you’re going to use PoE. Your Controller normally comes with two PoE ports. You may connect your AP directly to one of the PoE ports on the Controller to power it up.
You are going to see some log messages complaining about unable to get an IP from the DHCP server. It is because we did not configure the Controller to give out IP addresses. We must configure them manually.
*Mar 1 00:01:44.511: %CAPWAP-3-DHCP_RENEW: Could not discover WLC. Either IP address is not assigned or assigned IP is wrong. Renewing DHCP IP.
Not in Bound state.
Enable password is Cisco (upper case “C”).
Configure using the following commands.
AP#capwap ap ip address
AP#capwap ap ip default-gateway
AP#capwap ap controller ip address
AP#capwap ap hostname (optional). Here is what I configured:
AP84b8.02a4.695c#capwap ap ip address 172.25.10.52 255.255.255.0
If the WAP is directly connected to the Controller’s port, an IP is all it needs. If it is on a different subnet than the Controller, you need to configure the gateway and some DNS tricks explained in later session.
As soon as the WAP is configured with an IP, the magic happens. You’ll see a bunch of log messages coming out of the console and the LED turns Blue, Red, Green and flashing. The WAP is now registering with the Controller; the Controller tells it to upgrade its code if it finds code version inconsistency. After about 3 to 5 minutes, the first WAP appears in your Controller’s management console.
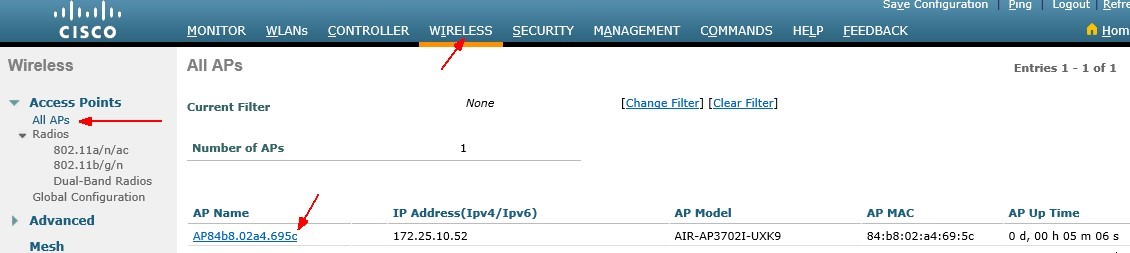
Repeat the same process until all your WAPs are registered with the Controller.
Note: If you prefer using DHCP to assign management IPs to the WAP, you need to either configure an Internet DHCP Server on the Controller itself or, pass the DHCP Request to your existing DHCP server on your network. You’ll need to configure “ip address-helper” on your Layer3 switch, as well as setup DNS records to help Wireless LAN Controller Discovery.
Configuration Example
From this point on, all the configuration is done at the Controller level.
Wireless Infrastructure Configuration
Based on our design example, we are going to configure-
- An Employee SSID for internal users. It has access to all internal subnets.
- A Guest SSID for visitors. It only has Internet access.
- Internal user authentication is through Microsoft Active Directory.
- Guest users are authenticated through webpage. Accounts are created manually on the Controller with automatic expiration. i.e. 8 hrs.
We first need to setup logical “Interfaces” on the Controller. As opposed to physical interfaces, logical interfaces are used for management and communications between AP and Controller, wireless clients with the AP and Controller. Logical interfaces can be assigned to one or more physical interfaces.
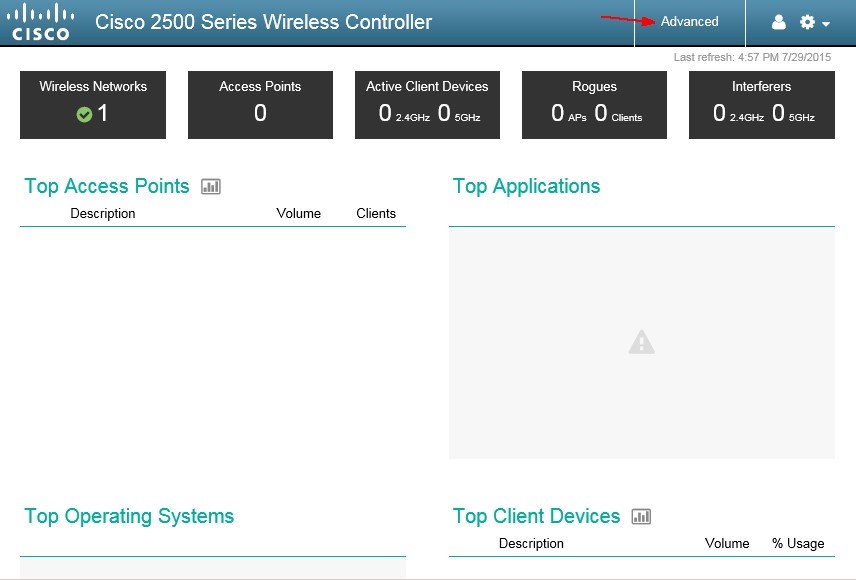
Login the wireless Controllers admin console at http://172.25.10.50/. Go to Controller –> Interfaces. You should already have management and virtual interfaces created during the initial setup.
Click on “management” interface and review the settings.